
![Fiat Motor Club [GB]](http://fiatmotorclubgb1.netfirms.com/wp-content/uploads/2017/11/Website-Header-v3.jpg)
By Rory Cole
 The story began when I started making enquiries about trialing (a type of off road motor-sport). It particularly appealed to me, as having been driving off road for the past five years; I decided I would like to do something a little bit more interesting, yet still utilising the basic off road skills I had developed. This being the case and with a car suitable, and even recommended, for use in that field, I decided to buy a clubman licence. This, available at the price of ten pounds from the M.S.A (Motor Sports Association), entitled me, at my then age of fifteen, to take part in standard and production car trials.
With the fields I drive in too wet at that point, I decided to start preparing the car, which I drove off road anyway, for trialing. The first thing that I did was to remove the tired 102,000 mile 843cc engine which, although still going strong, I decided was not competitive enough. The main problem, yet probably to be expected in an engine with that mileage, was its reluctance to rev as much as I would like. Performance below about 6,000 rpm I felt was fine. However, when it reached around 6,400 rpm it refused to budge any further, unless in first gear going downhill – surely not good for it. At 6,400 rpm the 843cc 850 engines are at peak power. However, I find that particularly when ascending a hill but trying to maintain speed, that it is very effective to slightly exceed this peak power figure. Doing this, when up-changing, the engine is further into the more ‘usable’ rev range, ensuring minimal loss of speed. I knew from experimenting, that the standard, and apparently rebuilt, Seat 843cc engine, originally in the car that I am restoring, will rev up to around 7,000 – 7,200 rpm no trouble. With this in mind I decided that if I were to retain this current, badly worn engine that I would be compromising myself competitively as well as detracting from my enjoyment of driving. I therefore decided to use a different engine.
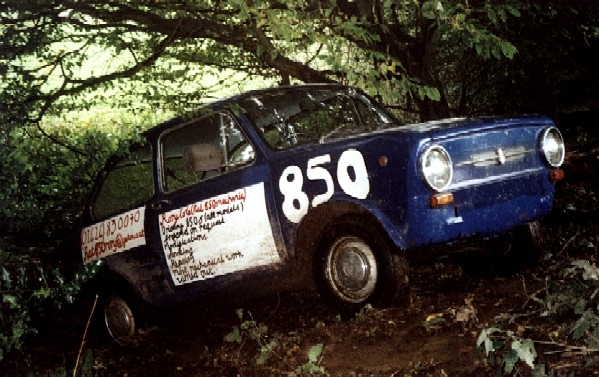
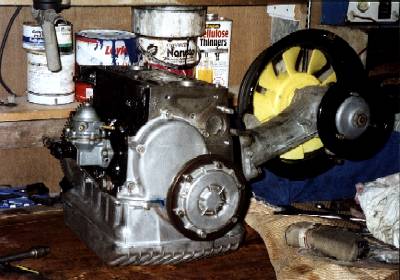
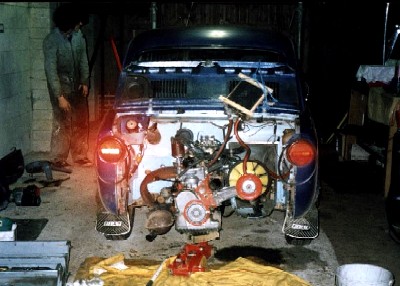
At this time, for around five years, the rustiest and most moth eaten 850 Sport Coupe I have ever come across, has been languishing in one of our barns. It sits on Fiat 600 rims with its original wheels and disc brakes removed, reconditioned & fitted to my Dad’s ‘Abarthised’ 600. It had been, until recently, covered by multiple and obviously carefully positioned, damp scaffold boards to dry out. These boards, all resting precariously on their edges, make it very interesting trying to get anywhere near the car without hitting one’s head and sending the lot tumbling down like a pack of dominoes. With a similar array of drying boards on the floor around it, I had had to abandon previous attempts of six or so months previously, to get it running (an interesting procedure involving hotwiring it – no keys). This had been with the intention of removing it’s 903cc engine which has: twin choke Weber carb, four branch exhaust, higher compression, hotter camshaft, and among other things will propel any unsuspecting 850 a great deal faster than any standard 843 unit. However, with the boards removed, and after freeing up a stuck valve, I set about the process of preparing it for starting. I changed the points, the plugs, the condenser, and the fuel pump and found it a distributor cap and spark plug leads. With this process completed. I tried to start the car, to no avail. It turned out that the fuel line from the tank was blocked and despite my best efforts, it would not clear. So I set about finding a long length of fuel line and a Gerry can of petrol. I hooked these up and then tried again. No such luck! The second-hand, replacement fuel pump was too feeble to get any petrol up to the carb from such a distance. I finally resorted to removing the engine intending to put it into the blue car. Engine out, I cleaned it thoroughly, and carefully tipping it onto the flywheel to clean the wonderful alloy sump found oil pouring out from under the rocker cover. Immediately righting the engine I discovered that where I had replaced a bent rocker stud, the new stud was fouling the rocker cover and preventing it sitting flush on it’s gasket. I trimmed this down, re fitted the rocker cover and all was well. Losing most of the oil in this way, I decided to drain the rest, and then replaced this with flushing oil.
 The next day I removed the worn engine from the blue soon to be ‘trials 850’ and installed the 903 engine with standard dynamo and slightly modified fan surround. Finally, after filling the cooling system with plain water and putting a gallon of petrol into the car I turned it over. Unfortunately, despite my previous success with most 850 engine work the engine refused to fire. I left the engine for a few weeks doing nothing and recently came back to it with my Dad’s idea of checking the compression. Well did it have any? Pffah! Next I tried the test with some flushing oil in the bores and this time the compression was much better – indicating bore wear. As a result, I decided to abandon the 903cc engine, with the cost of a re-bore in mind. Instead, I decided to strip the engine down and fit its major performance increasing components onto an 843 unit. Unfortunately this would lack the extra 60cc and high revving nature of the 903cc engine as well as improved cooling channels and oil distribution set-up. However with a low budget a modified 843cc unit appeared a sensible second best. As far as 843cc blocks were concerned I had three spare to choose from. Option one was a smelly, oily engine, which emitted clouds of smoke. This was in the car in question when I bought it and was quickly removed, as better alternatives were then available. Option two was similar except this one was noisy as well, refusing to run when warmed up. This was originally in the maroon trials 850 saloon (No2), which I will soon be preparing as a spare car, and was removed for the same reason. Option number three was in the green 850D saloon that I am restoring to 850 Special specification for road use. I already had a special engine for this car and therefore its current 57,000 mile, and apparently rebuilt, unit was available. This I knew was a very good engine. It was reliable, performed well and revved freely to around 7,200rpm. No prizes for guessing which one I chose and I soon set about stripping both the donor engine and the new 843 unit.
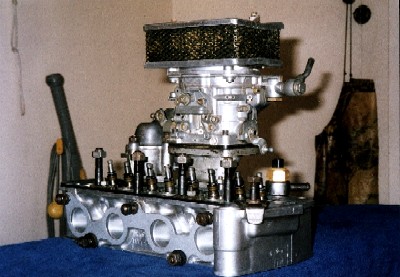
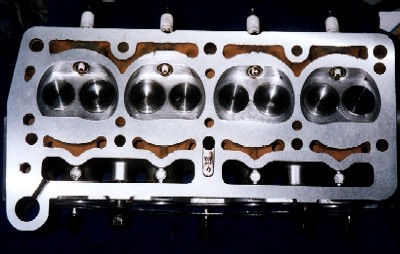 I started with the head of the 903 engine from which I removed its Webber 30 DIC twin choke carburettor, inlet manifold and air filter, four branch, free flow exhaust system, and the head itself which has 9.5:1 compression and bigger valves. Next I drained the oil and inverted the block on my workbench. I removed large finned alloy the sump and then the camshaft. I de-carbonised and cleaned all the head components thoroughly and lapped the valves in. The head had to be skimmed as it was quite badly distorted. I also had an insert fitted where one rocker stud had badly stripped its thread. Finally I cleaned the sump. After carefully and precisely laying out all the components ready for fitting I removed the same parts from the 843 engine and stored them carefully, along with the 903 block and its pushrods. After doing this I spent some considerable time cleaning and painting component parts as well as de-carbonising the engines piston tops. I ordered a new gasket set and oil seals, which arrived very promptly and at good prices from Fancy Engineering and then started to assemble my new engine. I took considerable care in particular when fitting the sump trying to avoid leaks. In the end this was accomplished to a very pleasing standard. I soon discovered that when using the 903 camshaft and cylinder head it is important to include the slightly shorter 903 pushrods as without these the rocker-shaft will not tighten down and damage could be caused to the tappets. Luckily I realised this in time and replaced the 843 pushrods with the correct ones. When the whole engine was assembled I set the tappet clearances, the timing, the points, filled the cooling system with water, the engine with flushing oil and the tank with a gallon of petrol. I attempted to start my creation of many hours to no avail. I slightly adjusted the distributor and it fired, however, it coughed and spluttered refusing to advance in revs. Adjustment of the distributor either resulted in the car stalling or an inexplicable revving to around 3,000rpm at which point the carb started back firing and again it would shortly stall. I checked everything- the points, the distributor, the distributor cap, the plug leads, the coil, the condenser, the rotor arm – none of which were known to have faults before hand.
 The carburettor had been reconditioned before assembly and I checked the timing on multiple occasions. After a while my Dad pointed out that, with the marks on the pulley wheel and timing case lined up, the rotor arm could be in two positions – one obviously being 180 degrees out. As far as I am aware it says nothing about this in the Haynes manual. I tried the timing in this new position and it wouldn’t even fire so back went the distributor to its original position. At this point I lost my patience and left the car. It remained like this for some time, however after a very informative email from Jim Spackman, the problem was brought to light. The mistake I had made was to have equal slack on both sides of, what was already a very loose timing chain. I removed the timing case, which was very difficult with the sump on and the engine in the car. However, I just about managed it by slightly flexing the sump with a clamp to allow removal of the case. This done it was an easy enough job to get rid of the slack on the driven side of the pulley and back on went the timing case. Although it had appeared that the sprockets were aligned correctly, when the engine turned and the slack was taken up, the timing had been incorrect. After much messing around getting the timing correctly set again on the distributor, various other minor problems and a good churning over on the fast charger, it fired up and ran very smoothly indeed. I warmed it up, making the obvious checks, while trying to avoid inhaling the nauseating gasket fumes it was producing. I changed the flushing oil for semi synthetic and took the car for a spin along the track I have made around our fields. Taking it carefully to start with everything appeared o.k. and the engine was performing better than an untouched (real) 903 engine in my coupe, whereas this is just an 843 with all the bolt on goodies. Every now and then I made checks and each time everything appeared to be fine. As a result, and wanting to get an idea of performance I started thrashing the thing around (don’t forget I hadn’t had it re-bored or anything, so this wasn’t quite as cruel as it might sound). Everything went fine, and it was revving very freely to peak power of about 6,500 rpm and then with a slight hesitation right round to 8,000 rpm, where deafened, shaken to bits and out of a degree of mechanical sympathy I lifted off. This continued for around half an hour until at around 6,500 – 7,000 rpm the engine note changed from a rasping roar (sorry, I’m getting carried away – awful screaming) to a far more worrying powerless clattering. I stopped and after making sure nothing was actually sticking out of the block, I very carefully took it home. An inspection under the rocker cover revealed two stray, but luckily undamaged pushrods. These were dutifully re-fitted and the tappet clearances set. I figured that I must not have quite adjusted them correctly the first time or tightened them down sufficiently and as a result these two were free to become loosened.
 Once again the engine was fired up and despite starting instantly from cold with minimal choke the noise was still there. As a result, I decided to take the engine to bits again to investigate. When the head came off, I found that half a valve had broken off and after breaking into bits, imbedded itself into the underside of the head. I think I have figured out why it happened now, although I wasn’t sure to start as it also coincided with the escape of the two rebel push rods. However I have come to the conclusion that it is all down to my excessive revving. I had ignored 7,000 rpm warning marks on my coupe’s rev counter which I dismissed expecting another thousand or so rpm. This however was only going by Fiats pessimistic red line markers for each gear on the speedo of the saloons. It turned out that Fiat were right after all. Perhaps in 1971 the valve springs may have been up to returning 8,000 rpm of valve but these had done 47,000 miles and it was the year 2001. As a result my engine met an abrupt, albeit temporary demise. I removed the worst of the damage to the head and purchased a new set of valve springs, a new valve and took the head along to the local machine shop. One hardened valve seat was inserted and the head skimmed again to remove the rest of the damage. Once the engine went back together again, I set myself a rough limit of 7,000rpm until perhaps I could afford a set of A112 7,5000 rpm rated springs, my idiotic engine screaming tendencies will have to wait. This engine, compared to a standard 903, still lacked the different pistons, higher capacity and improved cooling channels and yet it performed better, simply due to decarbonisation and reconditioning, than a 24,000 mile untouched 903 unit in a coupe I also have. The engine in question had done nearly 60,000 miles and had pretty poor compression. However, it still powered, hardly hesitating to 8,000 rpm and with some great sound effects before..well, you know. At the time of writing the majority of these articles, I had recently acquired a welder and carried out some quite extensive work on the inner and outer sills, floor, wheel arches and the doorpost bottoms. At the time I was really pleased with what I had achieved, however I now realise that the welds were pretty poor & I overlooked quite a few important issues. Well I had been teaching myself, & the car was only to be for trials use. At least it was now reasonably solid. The brakes were soon overhauled. I installed new wheel cylinders and a master-cylinder, two copper brake lines and new front brake shoes. After plenty of agro – leaking cylinders, hose connections, air locks, etc. everything ended up well and the brakes now operate excellently. A nice little mod, which Brian Alexander recommended, was an extra radiator at the back. One of these, a heater rad from a van, has been fitted and is linked simply into the cooling system. Mounted under the engine hatch it is conveniently in the airflow through the louvers. Controlled by its own valve this gives me plenty of leeway when using it for trials if it gets a bit hot. Some more jobs required on the engine were a timing chain replacement whilst also replacing the rear crank seal for a new one; the latter I had forgotten when putting everything back together. I was spurred into getting down to it sooner than planned because of a new problem. I had been using the car quite a lot around the fields, and for some time everything had been going very well. However, whilst driving it around in the wet, I started getting dodgy noises from the top end. It was strange because although it sounded like an obvious engine rattle, there wasn’t a noticeable power loss. Tracking it down was made even more difficult because of torrential rain and lots of wheel spin. However, something was obviously wrong and so I decided to remove the engine, do the timing chain etc whilst trying to figure out what the latest problem was. I set about doing this the same day (a Saturday), and with the engine out in about an hour and a half the problem turned out to be down to the pushrods again. No 1 pushrod had freed itself yet again and that the adjuster had wound right up it’s thread. Luckily this time no other damage had occurred, but I still don’t understand how it got loose in the first place. Never the lass, it was replaced, and tappet clearances set. I then removed the sump, doing the timing chain and crank seal with ease and no problems. The engine went back together without a hitch for the third time and was reinstalled on the Sunday. I fitted the odd new gasket where appropriate, and it fired up immediately running better than ever. An all round success, I thought. The same day I did another ten miles in the car around the fields and there were no problems with the engine for many days of driving after that.
A few days later, with the car still going strong despite a big dent in one side as a result of an altercation with the fence I decided to bodge weld patches over the remaining areas of rust – at the bottom of one doorpost and the rear arches before putting the car in for an M.O.T. With the car still going well, a few days before starting work for the M.O.T, the engine had another of it’s increasingly innumerable tantrums. More terrible noises ensued & I decided to remove the engine completely & replace it for the M.O.T. Nevertheless, and temporarily forgetting the naughty engine, the M.O.T prep went succesfully. I sorted out lots of electrical problems and did loads more welding. There were a few more holes than I realised lurking under the rear arch where three box sections come together. With all the welding finished, I filled the sills, doorposts and rear wings with thinned down waxoil and drained most of it out of the bottom. This will hopefully be very worthwhile in preventing the bodywork getting any worse than it already is. This is particularly important now that I’ll be using the car for trials, as it will be getting pretty muddy. The next week, it went in for the test, as planned, and to little surprise failed. However the failure points were very minor which was relieving. One indicator was not working, the brake pedal rubber had worn through, the horn was not working, and neither were the rear number plate lights. These problems were soon sorted and after the re-test I arrived home with an M.O.T certificate. Hooray! As a result of my craving for the more powerful, if smoky engine, I decided to put the ‘original’ engine back a.s.a.p. However before I could do this I needed to sort out the ever-recurring problems apparently emanating from the head somewhere. This is hardly surprising, as I didn’t exactly chose the best Coupe head when upgrading the engine. It was the top end remains of a J reg Sport Coupe, and was distorted, had a stripped rocker stud thread, stuck valves and lots of black everywhere. Despite this I overhauled it and to my dismay I ended up paying the price. When I took the rocker cover and shaft off, I discovered that one of the valves complete with collets was in the process of being sucked through the retainer into oblivion below. I was lucky to catch it at this stage to say the least. However, after the head came off, and the valve out, I replaced the collets and retainer and reassembled everything once again. On doing so I discovered another rocker stud had again stripped its thread, and more palaver of bodging ensued. The overall result was that it all went back together in the end & was running well once again. (Or at least so I thought).
 After more severe problems, however, I dramatically decided to break the whole engine for spares. The problems with the cylinder-head had started to manifest themselves again. It was just unbelievably unreliable. More significantly, everything attached to the cylinder head was unreliable, having the tendency to fly off left, right and centre. That added to the worn bottom end, really made the whole thing a complete and utter nightmare. Despite good power (for an 850) of about 50bhp, when everything was going well, the frequency of problems started to override this positive side. A valve spring retainer disintegrating and subsequent valve drop confirmed this. A stripped rocker shaft stud and similar tappet adjuster signed the decision in blood. However, with quite a good selection of new parts on the engine I decided breaking it would be beneficial enough to other projects. The replacement unit (temporary until a really good engine could be built) was a 44,000 mile 843 engine from an 850 D. This was serviced, a twin-choke and four-branch were bolted on and away I went. The car subsequently seemed to perform better than ever, despite less modifications.. More fields driving ensued & the new engine seemed to be going like an absolute little corker. About time, I thought. I ran the engine in standard guise for a little while, to determine it’s basic condition. All seemed to be well. However, in search of extra power, I soon exchanged the cylinder head for one from an 850 Special. This, coupled to a little twin choke Webber & four-branch exhaust, gives about another 10 bhp & improves its ability to sustain high revs. I completely de-carbonised the head, ground in the valves etc, and bolted it onto the 850D bottom end. It fired up again without much trouble & performed really well. What’s more, it was reliable internally (where it counts). In fact I was amazed by the reliability. I didn’t have a rev counter in the car at the time, but I’m sure it’s saw 8,000 rpm on a few occasions. With such good performance & reliability, I entered the car for a PCT. Thinking my trials car problems were finally over, I looked forward to the trial. Well, in true fashion my plans went somewhat out of the window. To start with the PCT I was going to be attending was called off. Then the car caught fire! I’d just finished making some final adjustments including charging the battery, & cleaning out the fuel system. (Which was clogging the carb with old fuel through lack of use). Whilst doing the aforementioned tinkering, it was necessary to remove the fuel feed to the carb. This, an old, original pipe, had become very hard over time. Ordinarily I’d have used boiling water to soften it before attempting to remove it. However, for some reason I didn’t. Instead I just gave it an almighty tug. On reflection since, this must have loosened the brass inlet pipe into the carb. Pleased with what I’d achieved on the car, I went for a spin. It was going like a dream for a while. However, soon the engine started to cough, splutter & hesitate. I drove the car back into the barn, revved the engine a few times & listened to things for a while. Just as I was about to switch off to investigate, there was an explosion from behind me. I turned round to see my plastic summer/winter engine covers go flying & flames coming through the subsequently exposed louvers. Always having a fire extinguisher to hand, the fire was out very quickly. Hmm not good though I thought, & not wanting to be faced with the damage, left the car untouched for a few days. On eventual inspection, although not severe, damage will probably necessitate removal of the engine to do some re-painting & attend to melted wiring. On inspection as to the cause, lo & behold one of many 850 weak-spots – the brass carb inlet pipe was found dangling in the end of the rubber fuel feed hose. No doubt this had been trickling a generous dousing of fuel around the engine compartment ever since I’d experienced engine trouble. Presumably the heat of a fully warmed engine must have been enough to cause ignition. The car sat blackened & forlorn for some time, before I could bring myself to do anything with it. As a result, over the past couple of days I’ve finally been getting around to making the necessary repairs. First I used the power washer to clean the worst of the carbon & extinguisher powder out of the engine compartment. Then I removed the engine, being necessary to facilitate re-painting/re-wiring. The engine removal was a very easy job & was accomplished quickly. With the engine out, I surveyed the damage. The engine appeared fine apart from partially melted plug leads & a very blackened carb. However, as suspected, a lot of the finer, older wiring in the engine bay was melted as well as a lot of paint & a few other odd plastic bits. At this stage I started to think hypothetically about installing my freshly re-built 903 engine, which was, at that point, sitting waiting to be fitted to the ’Sea Green Saloon’. The issue that aroused this consideration was the fact that progression with the suspension & bodywork of the ‘SGS’ required money to finish it & get an M.O.T. ‘Spend money on it then’ would be the obvious response. However, at present I have exactly no money towards that project, let alone the £1000 odd it’s going to cost me to insure an 850. This begged the question: ‘Why not put the 903 engine in the trials car & use that on the road to start with instead?’ As I had taken the engine out of the trials car anyway, I considered installing the rebuilt unit permanently. I’d have built a similar engine for it eventually anyway & doing this would instantly give me a good all round car – powerful, solid & reliable, if scruffy. Suddenly a really good solution seemed to have appeared to a problem I’d forgotten I had. This plan, as well as giving the trials car a new lease of life, would also mean I could take work on the ‘SGS’ a little more leisurely & I’ve got no end of engines/possible engine builds to chose from for that! Well that settled it. I decided I’d definitely go ahead with the new plan. The Trials car, as I said, is already M.O.T’d & is tax exempt. As a result, when the new engine is fitted. I’m going to get my Dad to insure the car temporarily until my test, & he can run it in for me. Hopefully he will even drive me to a few trials in it! (Incidentally it’ll cost him/me £113 fully comp, with recovery & agreed value of £1k.Pretty good, I thought.) Back to repairing to the fire damage with renewed enthusiasm, I set about stripping the engine compartment. Guess what I found. Yes, a massive great hole in the parcel shelf going through into the engine compartment. At least now I’ve pinpointed where water was getting into the car from. The parcel shelf is double skinned & rust had eaten through a hole, once opened up, of about 30cm sq! The rear screen had to come out & there was more rust under that. I’ve made a nice repair to it though. As if this undeserved engine upgrade wasn’t enough, more opportunities seem to have arisen to improve the trials car even more. The first of these came by way of an advert in the current ‘Parliamo’. The add in question was for a set of panels for an 850 Saloon. These included front wings & panel, sills, n/s floor pan & rear arches. A deal was settled for £50 (including delivery of course)!!!!!!!!! All the panels on the trials car are solid at the moment. However, there are loads of dents, filler & bad welding – where I was getting a bit ahead of myself once in position of the welder. Saying that, the welds aren’t that bad. Anyway, the point is that these panels can be stored away somewhere safely & slowly as needed (a sort of rolling restoration) I can use them to replace the old ones. I’ll hopefully be able to do it a bit at a time e.g a wheel arch one weekend etc. So, things finally seem to be coming together, & with both my parents prepared to drive me to trials in it, with a new engine waiting to be fitted & driving licence time just around the corner, I’m almost ready to start enjoying 850 ownership once again. I think I must have learnt every lesson there is about using Fiat 850s? I really hope I have anyway!